I installed Windows 2008 Server x64 with Hyper-V since a while on my laptop. Hyper-V was a great way for me to build up prototypes of several servers in a V-LAN and once you tasted the multiple Snapshot feature, it’s hard to live without it.
Now it’s clear that Windows 2008 Server wasn’t meant to be used on a laptop and you have to sacrifice some features or be tricky to get what you want.
One of the things that bothered me the most was finding a way to get my VM having internet access either when I’m plugged to the internet through WIFI (home) or Ethernet (work).
These two cases can be separately solved:
– With WIFI you will use a Internal Virtual Network for your VMs and enable Internet Connection Sharing (ICS) from the WIFI adapter, pointing to the Internal Virtual Network.
– With Ethernet, create an External Virtual Network and you’re done.
Now I don’t want to constantly switched from the two Virtual Networks depending on if I’m using WIFI or Ethernet, it’s taking time and your VMs are not always happy about the changes…
The solution will look familiar to people that used Virtual PC for complex things: using the Microsoft Loopback Adapter!
Here are the steps to perform
Add the Loopback adapter
Go to the Control Panel, then “Add Hardware”
Click next to get to the screen when you choose to install the hardware manually:
In the next screen select the “Network adapters” category, click “Next”.
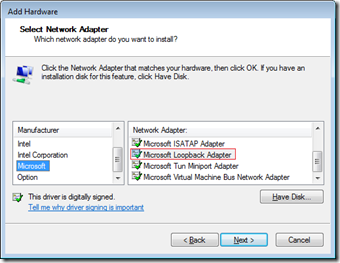
In the “Manufacturer” list select “Microsoft”, then select the “Microsoft Loopback adapter”:
Click next twice and you will get your Loopback adapter installed in few seconds.
Creating the Hyper-V Virtual Network
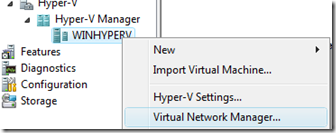
Now go to the Hyper-V console and right click on you Hyper-V host and select “Virtual Network Manager”:
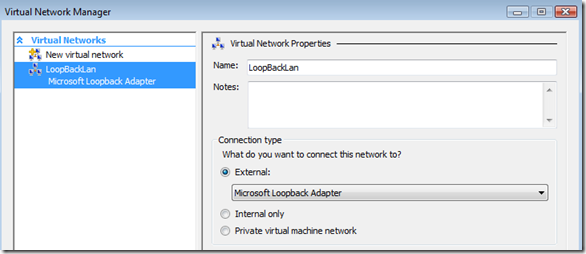
Follow the standard procedure to create an External Virtual Network using you newly created Loopback adapter:
I called mine “LoopBackLan”.
Setting up the Virtual Network
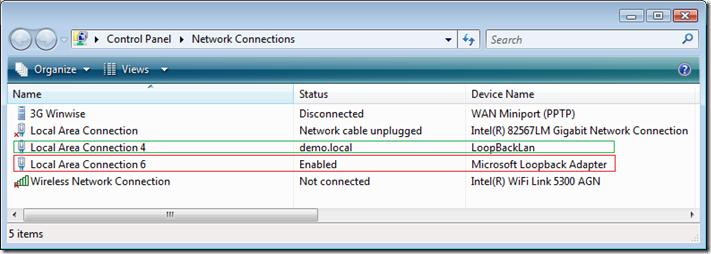
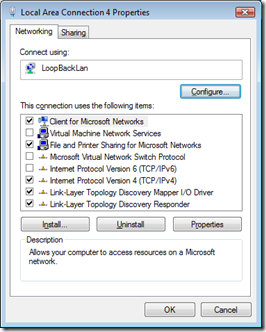
The next thing you will have to do is setting up the TCP/IP configuration for the newly created connection. If you’re unfamiliar with Hyper-V, you have to know that creating a Virtual Network will have for result to create a new Network Connection. You will see it from the Control Panel’s “Network Connections” item.
The connection squared in red is the logical Loopback adapter you add in the first step.
The one squared in green is what was created by Hyper-V.
You don’t want to touch the configuration of the red one.
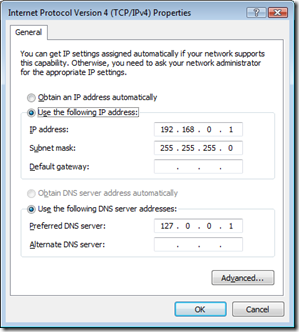
Now you have to configure the green one:
You have to manually setup the IP and it has to be 192.168.0.1, it’s a restriction of ICS (we’ll see that just after).
You’re ready to set this this External Virtual Network to your Virtual Machines!
Enabling internet access through ICS
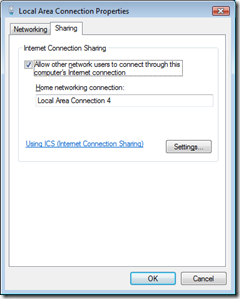
To get internet access, just enable ICS on the adapter that is active, for instance if you’re plugged to the LAN, go to the “Network Connections” panel, select your LAN adapter and display its properties, select the “Sharing” tab and configure as followed:
The “Home networking connection” has to be your Hyper-V External Virtual Network (remember, the green one).
Now if you want to switch to WIFI, just disabled the ICS from the LAN and repeat the action on the WIFI adapter and you will be fine!


